 |
 |
Resources |

|
Table of contents: |

|
A、登入 cluster 的方式
IP:120.126.104.77 帳號:請向管理者申請 密碼:請向管理者申請 以下是連線操作說明及建議事項: 一、MAC OS 環境:打開 terminal ,輸入 ssh -Y your_account@120.126.104.77 ,出現 password: 時輸入密碼即可。(輸入密碼時,沒有顯示任何字樣是正常的) 二、WINDOWS環境:請下載 https://mobaxterm.mobatek.net/download.html。(使用說明:https://richarlin.tw/blog/mobaxterm/) 三、登入後,請執行 mkdir directory_name 。(name 請自行決定,譬如:yusen; mkdir 是建立資料夾的指令) 四、執行 ls (列出檔案及資料夾清單的指令),有看到出現資料夾的名字,就OK了。(當然,已經很熟的人,可以進入自己的資料夾,自由發揮) 五、執行 exit 登出。 PS1:請注意 Linux 環境,大小寫是有區別的。
以上提供大家參考,若有問題及建議,再請告知。
TOP |
|
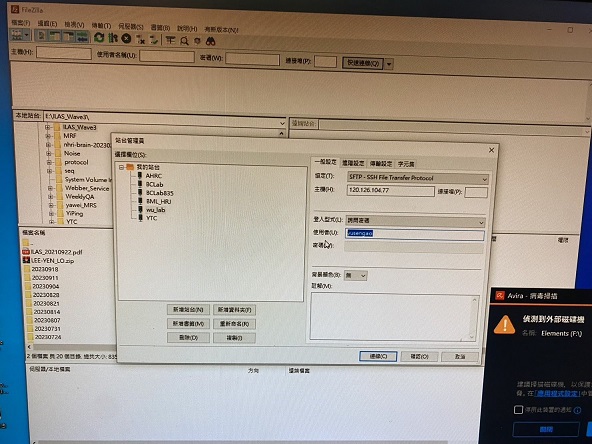
已經在 MRI 室的檔案電腦的 FILEZIILA 軟體,設定 wu_lab 站台,未來可以直接將 MRI 資料上傳至 cluster 。
操作方式說明如下,操作上有問題再請告知。
建議不要點選儲存密碼。
上傳方式:
一、打開 FILEZIILA 軟體,點選左上角站台,選擇 wu_lab 。
+ 二、輸入帳號後,點選連線,然後跳出密碼輸入畫面。
 三、成功登入後,就可以用拖曳的方式,將檔案上傳。
TOP |
When dealing with MRI data that includes functional, field map(FMAP), and T1 images, organizing such data efficiently is essential for subsequent analysis. Below is a suggested folder structure example: Project name (e.g. PE_3outcomes) ├── func_dicom2nii └── RawData └── Date (e.g. 20230920_WuLab_test) └── Subject name (e.g. WU) ├── F1 ├── F2 ├── F3 ├── F4 ├── F5 ├── F6 ├── FMAP └── T1 Date_Subject_Name: Each subject has its own subfolder. You can have multiple sessions for each subject. Func: Contains functional MRI data. Each run is in a separate file. FMAP: Contains field map data. T1: Contains T1-weighted anatomical images. fMRI protocol.pdf: Include any specific details about the dataset, such as scanning parameters, experimental design, or any other relevant information. TOP
Firstly, for each experimental block with its corresponding protocol, there may be different configurations. Taking the example of the PE_3outcomes experiment, there are 6 blocks denoted as F1, F2, F3, F4, F5, and F6. In each folder, data for both FMAP and T1 will be present, and all these raw files are in DICOM format with the file extension IMA.
Next, we need to enter each folder and convert the DICOM files to NIfTI format using the dcm2nii tool. To accomplish this task, we will use a shell script named func_dicom2nii. func_dicom2nii: The PATH of shell script is /home/wu_lab/test_student/project_distribution/func_dicom2nii : Based on the required parameters and their names, after making the necessary modifications, execute the script by typing: ./shell script name, and provide the required parameters. For example, ./func_dicom2nii rawdata/20230920_WuLab_test WU niiData pilot001 F2
Subsequently, Pilot001 will be placed into the converted files after the conversion process.
PE_3outcomes/
TOP
├── func_dicom2nii ├── niiData │ └── pilot001 │ ├── F1.nii.gz │ ├── F2.nii.gz │ ├── F3.nii.gz │ ├── F4.nii.gz │ ├── F5.nii.gz │ ├── F6.nii.gz │ ├── fmap_e1.nii.gz │ ├── fmap_e2.nii.gz │ ├── fmap_e2_ph.nii.gz │ ├── fmap_mag_brain1_mask.nii.gz │ ├── fmap_mag_brain1.nii.gz │ ├── fmap_mag_brain.nii.gz │ ├── fmap_mag.nii.gz │ ├── fmap_phase_rads.nii.gz │ ├── T1_brain_mask.nii.gz │ ├── T1_brain.nii.gz │ └── T1.nii.gz └── RawData └── 20230920_WuLab_test └── WU ├── F1 ├── F2 ├── F3 ├── F4 ├── F5 ├── F6 ├── FMAP └── T1 Cluster 中練習用檔案路徑為 /home/wu_lab/test_student/2022_predictionError 資料夾結構如下:
RawData資料夾內容:
步驟 1.將 input.csv 檔依檔案夾位置(收案日期、受試者名字)及受試者編號建檔
cd /home/你的資料夾/2022_predictionError/RawData 3.在terminal/Linux Shell依序輸入 input_file=input.csv PATH_dicom_0=/home/你的資料夾/2022_predictionError/RawData PATH_nii=/home/你的資料夾/2022_predictionError/niiData/2023 bash func_dicom2nii_list $input_file $PATH_dicom_0 $PATH_nii
輸入時須注意 PATH_dicom_0(dicom檔讀檔位置)及PATH_nii(nii檔存檔位置)的路徑是否正確
Windows環境下,若將 input.csv及func_dicom2nii_list 檔案下載到本機環境修改後運行出現錯誤,有可能是文件格式問題。 例如:
TOP |